mikegreenimages

Mike Green's thoughts on landscape photography

Posts tagged ‘desert’

Locations for photography: the Salar de Uyuni, Bolivia

Writing about the Salar de Uyuni as a photographic destination and avoiding producing a simple eulogy for this astounding location is going to be difficult and, to be honest, I’m not going to try overly hard to achieve that. I do intend, however, in amongst the superlatives which will doubtless follow, to describe the area in terms of how it can be used for photography, what I think works and how to approach it logistically.

I should also point out that I’m deliberately separating the salar from the Andes of southern Bolivia, which are immediately south of it. It would be natural – at least for anyone who’s travelling a long way to visit the salar – to combine the two areas, and I’ve done so twice now, but since they’re radically different in character I’ve decided to write another article in a week or so describing the lagoons of Bolivia and the Atacama desert, in Chile.

I am not attempting to describe every facet of the logistics or photographic options here. Details such as climate, available accommodation and transport, etc. are all available on numerous sites. This article covers primarily those items most closely related to making a successful photographic trip.

Salar sunset

Firstly, a little of the eulogy thing and a few large numbers…

I’m a fan of barren, deserted places and wide expanses. I’m also rather enthusiastic about mountains. The Salar de Uyuni is 10,582 square kilometres (4,086 square miles) of salt, surrounded by Andean peaks and varying in thickness from ‘very little’, at the edges, to several metres over most of its area. Very approximately, it’s circular and about 100km across, slightly more in many places since it’s more of a blob than a circle. There are a few islands in this ancient, salt sea and they demonstrate the origins of the place by being composed of rock and coral, still remarkably sharp after something like 30-40,000 years since the water disappeared; one of my boots, whose toe I carelessly dragged across a piece, attests to that.

That’s enough of impressive numbers: the Wikipedia item, unsurprisingly, has a wealth of statistics and details on the geomorphology, with lots of ‘…x times larger than salt flat y…’ and similar comparisons with smaller, lower, thinner, less white salt flats! Ah yes, one last number: it’s 3,656m. above sea level, give or take less than half a metre at any point. That’s a pertinent figure to which I’ll return below under ‘altitude logistics’.

In summary: it’s a huge, startlingly flat area of very old salt dotted with cactus-covered, coral islands and with a backdrop of volcanoes. What’s not to like, at least in terms of spectacle and photographic opportunity? Admittedly, I wouldn’t want to attempt to live on it: doing so would surely be a brief and uncomfortable experience! Living temporarily on the edge of it, on the other hand, and taking daily excursions out to the islands, or to areas of nothing but salt, is fantastic! It’s about as close to other-worldly as I’ve ever come in a fair bit of travel. Forgetting about photography, just being on the salar is a brilliant experience and I’d recommend it very highly indeed.

OK, that’s most of the obvious superlatives used up so I’ll talk about photographic opportunities and logistics a little before returning to the extreme words a little later in this article.

So what is there to photograph?

At the risk of being trite: salt. Salt in lots of different patterns though, and in quantities which are pretty close to indescribable in their sheer enormity. As a foil to the salt, there are the islands. These are mostly covered with very large numbers of cacti – large cacti of the ‘several metres high’ variety – which grow in amongst the coral and rock and can be used to make excellent images as the low sunlight catches them (though not by me it seems – I was obsessing over the salt flat itself and failed to notice the photographic potential of backlit cacti).

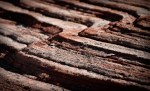
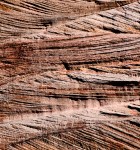
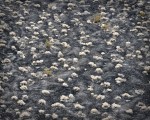
Returning to salt… The annual cycle of water on the salar – sometimes it floods briefly and very shallowly to produce a giant mirror which can be used for stunning ‘reflected sky’ images – means that the surface forms several different types of patterns. They’re all stages on the way to becoming the classic ‘hexagonal ridges on a fine, flat surface’, which means that different areas will have, variously, lots of tiny cones, zig-zag lines, a mixture of these with visible hexagons, and the full hexagons themselves, not to mention a broad gamut of in-between stages. This variety of surface – whose changes in nature can be felt as you drive across it in the dark – is fascinating. At least, it’s fascinating to me as I like the wide range of potential foreground patterns.

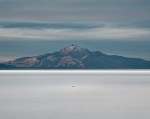
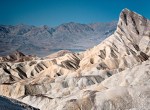
The sky-line will mostly be ‘distant mountains’, but they’re very fine mountains with some good lines of colour and folded shapes, so they do make a good back-drop to the salt. Alternatively, the few islands offer the potential for images with both salt and relatively close-by land. Of course, with a long lens, those distant volcanoes can form the major part of a composition.

Salar: Cerro Tunupa

And then there’s the sky

The sky is the tricky aspect of the salar, photographically. As you’d imagine, this is a dry area, meaning that the weather is consistently ‘good’, in the sense of clear and sunny. It also means that there often isn’t much in the way of cloud. There is generally enough to add some interest above the horizon at dawn and dusk though, particularly at dawn. Whilst the Sun is more than slightly above the horizon everything is bathed in very strong light, so during daytime the clouds don’t tend to be quite as relevant anyway since it’s tricky to make a worthwhile shot in those conditions. It’s still utterly spectacular of course ;-) Plus, heat hazes on the salt can give distant islands the appearance of hovering above the surface, floating in the air like the cover of a ‘Yes’ album or the floating forests from ‘Avatar’.

Colours

The colour palette is remarkable. It’s quite restricted, consisting of rather a lot of white, shades of brown and ochre in the mountains, and ‘normal’ sky colours, depending on the weather. What it doesn’t have is green, or very little of it anyway; don’t go there to photograph trees! What vegetation there is around the periphery (shore?) tends to be bleached to yellow and orange, and even the cacti are predominantly brown and red rather than green. This is perhaps partly what gives the place it’s slightly surreal appearance. Naturally, nothing but salt crystals grows on the salt itself.

Time of day

Yes, dramatic shots can be made during the hours when the Sun is above the horizon, but the salt really is very white indeed and the reflected light is extremely bright. The patterns more or less disappear under direct sunlight, at least for photographic purposes, and the coral islands suffer from harsh shadows reaching out from themselves onto the salar. If you’re taking more detailed shots then the shadow complexity of the boulders and coral, with their burden of dense cacti, is ‘unhelpful’, at best. In short, you’ll really want to be out shooting around sunset and sunrise and I liked the light best when the Sun was actually below the horizon, often by as much as half an hour (which is reasonably dark this close to the equator).

Having said that, when the Sun is very low, but visible, some of the islands can form dramatic shadows, the cacti become beautifully backlit, and if you’re spot on with timing it is just about possible to catch the light as it hits the salt surface. This next image is the second of three captures: two seconds earlier there was no direct sunshine; two seconds later there is next to no definition left in the salt. Timing is everything if you want to do this sort of thing!

Pixie dust

Time of year

I went in winter the second time, summer the first. I preferred winter since it’s quieter and it’s well away from the wet season. I’m not that keen on the mirror effect of the flooded salar really, at least in part since if the whole salar is wet, as it can be on occasion, then that’s pretty much ‘it’: you can photograph mirrored sky and hills, but not the salt patterns, what with them being inconveniently underwater. It’s either rare or unheard of to have a flooded salar in winter; hence my preference.

The important point to note is that it really isn’t very warm first thing in the morning in winter. Specifically, it often drops to approaching minus 20 Celsius, which categorically counts as ‘really quite chilly’ to me. Dressing appropriately is critical from a health point of view, as well as in order to retain the ability to capture photographs. That said, if you do dress properly, it’s entirely fine :-)

Later in the day, however, it becomes hot. The widest range we experienced was something like minus 20 Celsius before dawn to plus 25 in the mid-afternoon. Not only do you need to dress appropriately, you need to change a lot too, unfortunately. All these minor considerations are just that though: minor. If you’re properly prepared then it’s a very fine place to be indeed, as I may have mentioned already.

Altitude logistics

That last of my numerical points above is significant, at least in terms of anyone planning a trip to photograph the salt flat. If you’ve not been to altitude before – let’s say anything over 2,500m. – then it’s important to know that Uyuni is high enough to feel the effects, but generally not severely. Two miles up, as it is, is probably going to cause minor headaches for a day or so in most people, but nothing more serious in general, though you’d certainly not want to be running around much, at least not for a few days after arrival. Of course, if you’ve been travelling around South America and have been above 3,000m. for a while then you’ll be acclimatised and won’t have any problems.

The altitude is part of why I’m discussing the salar separately from the nearby, Andean lagoons: the latter are much higher, approaching 5,000m; an altitude at which acclimatisation is not a ‘nice-to-have’ but pretty much a requirement, and one which it’s also difficult to fulfil. I’ll talk about that in the next article. For the Salar de Uyuni, however, the issue is minor and there are effectively two approaches to getting there:
– overland from La Paz and then driving south for ten hours , which for most people will involve landing in La Paz at 3,600m. (the airport’s over 4,000m. but the city is in a huge cleft beneath it which appears as if it could have been produced by a giant with a very large axe);
– overland from San Pedro de Atacama in Chile.
The advantage of the second route, quite apart from the Atacama being rather excellent, is that it’s possible to spend a little time slightly lower: San Pedro is not much over 2,000m. Unfortunately, in my experience at least, that’s not actually high enough to acclimatise much, not to mention that it’s even further overland to Uyuni from San Pedro than it is from La Paz…

I’ve twice approached from Chile and I’d do it again if necessary; however, given completely free choice I’d go via La Paz in future. As I said, altitude effects are, for most people, not too severe when well below 4,000m. and it’s logistically somewhat easier to reach Uyuni from the north. Even if you’re planning on visiting the altiplanic lagoons as well as the salar, I’d do the latter first if possible, purely since a few days at 3,656m. is excellent acclimatisation before moving to the lagoons further south.

Personally, I have a great deal of experience of being at altitude in mountains and have rarely (only once) had a problem, other than in southern Bolivia, having approached from Chile, where it’s near-unavoidable to climb from just over 2,000m. to over 4,000m. in one day and stay there. The staying there aspect is the issue: acclimatisation is broadly achieved by ‘go high, sleep low’, meaning that you ascend a nice long way then drop back down to sleep about 300m. higher than you started from in the morning, ideally. From Chile, both times I approached that way, I noticed the 2,000m. change in altitude in the form of headaches. On the other hand, Uyuni’s low enough to be just mildly discomforting for a day or two and it can be reached from either San Pedro or La Paz in one long day. Much better!

Racetrack

Circumstance logistics

By that I mean the question of whether you visit the salar on a normal tourist trip, on a photographic trip, or independently. If you’re primarily travelling for photography, I’d strongly advise ruling out the first, ‘normal tourist’ option. These trips are excellent, but not remotely optimised for photography since they provide insufficient time and at the ‘wrong’ times of day. If you like huge expanses of über-bright whiteness, the middle of the day is perfect, but it’s a bit limiting, to say the least. Most trips will have sunrise on one of the rock/coral islands, but the time is severely limited, not to mention that everyone else is there too, dotting the pristine expanse of the salt with vehicles and people.

The other two options are photographically very similar. Essentially, travel around the salar is by Toyota Land Cruisers; some drivers are radical enough to use other 4x4s, but they’re in a tiny minority. That means you need a driver, and most companies will insist on a guide too. So, you either need to be on a photography workshop or you need to act all patrician and hire a vehicle, driver and guide yourself. The costs are actually not vastly different since Bolivia’s a very poor country and rates are relatively low, but planning is greatly simplified by going on an organised workshop. Also, rates are relatively low, not absolutely low: hiring a vehicle, two people and their accommodation is not cheap as such! This is a pretty good option if you have two or three people and there are no workshops available; very reasonable, cost-wise, and with complete flexibility.

I imagine it’s possible to hire a vehicle and drive onto the salar yourself but this would be, at best, unwise. I’ve not asked whether it’s actually allowed and it’s not something I’d seriously consider myself: the inconvenience of getting stuck might transform itself into actual danger!

It’s probably worth pointing out that a vehicle is essential. To ‘do’ the salar you need to get out onto it. Whilst people do cycle across it, that’s more of a ‘thing to do’ than a sensible means of transporting yourself around for photography. Lots of things are possible of course – I doubt that anyone has yet crossed the salar by pogo-stick, for example – it’s just that some options will have a higher comfort factor and a greatly increased likelihood of being able to capture some worthwhile images.

Personally, for photography, I’d not consider being there with less than a vehicle and a driver. Ideally there should be two vehicles. I’m not sure whether drivers are willing to drive out onto the salar at night with one vehicle: even in the dry season (most of the year) there are soft areas at the edges and some Land Cruisers do become bogged down and require rescue. In the wet season the whole salar can be covered with water and the 40-60kph driving speed enjoyed most of the year reduces to 5kph. So, if you want that astonishing reflection from somewhere in the middle, be prepared for a long, long drive out!

Colchani salt cones

Location logistics

The primary access point to the salt from the Uyuni side is via Colchani, where the salt is mined, essentially by hand at present. This is around half an hour’s drive from Uyuni itself and then you head out onto the salar through the mining area. That’s something of a grandiose term, incidentally. Essentially what it consists of is cutting troughs in the surface to form cones of salt about one metre high, using manual tools. These are then left to dry before being loaded onto the back of open trucks and stored in large piles in Colchani itself.

As an alternative to staying in Uyuni, or perhaps Colchani, there are a few salt hotels around the edges of the salar. I’ve stayed in the Tayka de Sal on the northern edge of the flats, just about in the centre of the second image in this article and a couple of hundred metres back from the edge of the salt (it’s 50km. away – definitely not visible!). As the name suggests, the hotel is constructed of blocks of salt and is of a remarkably high standard compared to most hotels in the area. I’d recommend this location above one of the many Uyuni hotels, due both to proximity to the main objective and to the views, though if you’re desperate to communicate outside Bolivia then, in common with most, if not all, locations around the area, there is no ‘net access.

I’d in fact recommend all the Tayka chain of hotels. They’re dotted across the southern Bolivian Andes and seem to offer the nicest, if not the cheapest, accommodation in the area. I stayed in the cheapest places on offer on my first trip. They’re functional, but if you’re not on a tight budget then the Tayka chain is well worth the extra expenditure.

The bottom line

As I suggested above, the Salar de Uyuni is comfortably the most bizarre and surreal place I’ve ever been and I’d recommend it very highly indeed to anyone who enjoys something a bit different.
– The sheer size and nature of the place is astounding.
– The colour palette is remarkable.
– The weather is predictable and well-suited to photography.
– The physical logistics, whilst they can take a bit of arranging, and whilst for most people they will involve a long journey, are actually not a significant problem once they’re in place.

All-in-all, it’s a fabulous photographic destination and I genuinely can’t recommend it highly enough.

As I think I said in reference to Lofoten earlier this year, if you can, go there!

Finally, if there’s something about the Salar de Uyuni that you’d like to know, or if you’d just like to comment on the place or this article, please do use the comment box below.


Musings on: meeting my own expectations

About a year ago, thirteen months to be precise, I wrote about my ‘need’ to return to the Atacama Desert and the Bolivian Altiplano. To grossly summarise that article: I went there two years ago, before I’d started making images in any way which could be described as ‘serious’. Then I learnt a lot more about photographic image-making and felt that – it being an entirely spectacular location – I needed to return armed with my new knowledge about things photographic. To some extent I meant that in terms of technique but, far more importantly, I shall return with a different and, I hope, improved vision.

So, I booked myself a trip which will take me to all the same places that I’ve been to before, but with the specific, primary intention of capturing images, rather than general tourism. Not only that, but it’s in winter, so things should be different (notably, about 50C colder, it seems…. ). That trip is now imminent and, over the last couple of months, I’ve had a few fears of the journey failing to meet my expectations; I’ve had doubts about what I can bring back from South America in terms of images.

I’m pleased to say that those feelings are now resolved; at least, they’re not noticeable, so either I’ve resolved them or they’re now reassuringly suppressed :-) This article is about how I removed the anxiety.

Layered sunrise

So what was the problem?

When I went to the Altiplano a little over two years ago, I was just wandering about playing with my then-new, first, dSLR camera. I was merely travelling, looking at things, and pointing a camera at them. Yes, I was certainly trying to point the camera at interesting things and operate it properly, but essentially I wasn’t ‘a photographer’ at the time, simply a tourist with a camera. This time, I’ve set myself up to go there as ‘a landscape photographer’, with the specific intention of making images which improve on the first set I captured.

Not only that, but this time I’ll be using a better camera and lenses, I’ll be on a trip designed for photographers, and I don’t expect to see anything, in the big picture sense, that I haven’t seen before. All of that can add up to a combination of high expectations and a modicum of self-induced pressure to ‘perform’.

My niggling concern – I’d not go so far as to give it the title of a real worry, but it was certainly something which had come to nag at the back of my mind over the last few weeks…. my niggling concern was that I’d come back with the same shots, or even shots which aren’t as good as the first set. Bolivia from the UK is a fairly long way to go to reproduce something you’ve done before ;-)

And how did I resolve it?

Let’s assume that I have resolved the issue and that I’m not simply suppressing it. I’m sure the latter wouldn’t be a good thing, though that knowledge admittedly comes from watching films and television where ‘suppressing stuff’ is generally not seen as desirable!

The best aspect of this is that I sorted out my worries by re-reading a few of my own blog items!

Firstly, I read the Altiplano one to remind myself why I’d been so committed to going back. It re-established in me the feeling of just what a spectacular place I’m visiting. In that context, I actually don’t care if I fail to produce any new images: even if I had no camera, I’d still be more than happy to go on the same trip and watch the light change in those stunning locations. This time, I’ll be in the same places as before, but at dawn and dusk; the light will be different from last time, and it will change (unlike the previous visit, when it was effectively bright, unmitigated sunshine all the time, with very few exceptions). I’m entirely happy to sit and watch varying light in beautiful surroundings, whether or not I also use it to make images. That said, if it’s as cold as it might be then it’ll be more of an ‘experience’ to be there, rather than unequivocal ‘fun’, I suspect!

Secondly, I read my several Lofoten and US South-West desert ‘Locations for photography:…’ articles. For each location, I was reminded that I came back with shots which were, for the most part, markedly different from those I’d expected. True, I’d not been to either of those places before, but the point is that, once you’re in a place, what you see is generally different from your expectations and is affected by all sorts of factors; things like your mood, what you’ve seen photographed before and how it’s been photographed, the particular weather conditions, the time of year, and doubtless many other things. I’m confident that ‘vision’ is one of those factors, and since my vision has developed, so should the images I make from the Atliplano landscape.

Thirdly, I read a handful of my own ‘musings’ and could see how my thinking on image making has developed in the last couple of years. I’m not the same person now, in terms of my attitude to capturing light and making images from it, as I was in Chile and Bolivia in March 2010. Whether those changes which have occurred are for the better or not is irrelevant: I’m different as a photographer now and hence what I see in the landscapes of the Altiplano and Atacama can safely be expected to be different too.

Finally, it doesn’t really matter if I produce identical images. If I were professional, reliant on making new, saleable images to live on, then I think I’d quite rightly be somewhat trepidatious. I am, however, at a stage with my photography where I’m still very much developing the skills and attitude that are required: I can’t be certain of going to a place and making worthwhile images. Yes, I do expect to, but there’s no guarantee. Not that there ever is, but I suspect that many people can be more confident than I have a right to be at this stage!

Salar de Uyuni at dawn

And the point of this post really was?

This piece started out as a musing on performance anxiety (of a sort!), but my more significant, personal, learning point is that writing this blog is genuinely useful to me.

I said about eighteen months ago, when I first started putting my thoughts out in this form, that part of the idea was to have something to refer back to; to enable me to see how I’d changed. Re-reading those few articles I have, I can see that there are certainly developments over the period.

There’s more to it than that though: by reading my past thoughts I’ve been reminded of various things which have all fed into my experience as a photographer and which have proved specifically useful right now in allaying the minor ‘fears’ I had. Doubly useful then, and perhaps next time I go back and read some of this I’ll find another broad category of usefulness?

A suggestion

I’d therefore like to suggest that the activity of writing a web journal / blog, or even just keeping a personal diary of thoughts and attitudes to photography as you progress, is a really rather good idea, if only for the wholly selfish, but compelling, reasons that it can serve as reassurance, as reinforcement, and as a record of development. Only the last of those things was more than a vague concept when I started, and this is the best instance so far to prove to myself both that the original idea was valid and that there are other benefits too. And if anyone else finds value in these musings and location commentaries, then that’s even better!

The images in this article are, of course, from my first trip. I’m now looking forward to seeing how different the next set will be!

Shadowed peaks

Locations for photography: Canyon de Chelly, Arizona

My final ‘locations for…’ item from the US

Were I to write about all of the remainder of the locations we visited in the US recently, and which I’ve not yet talked about in the last few articles, I’d be covering old ground, both in the sense that they are very well-described on the web already, and in that I’d be repeating some general observations which I’ve already written. Monument Valley, The Grand Canyon, Bryce Canyon, they’re all much-photographed and very familiar subjects to many people. They are all, of course, well worth visiting simply to experience the grandeur and sheer scale of each of them.

Canyon de Chelly is another matter. Maybe it’s just me, but it feels considerably less well-known than everywhere else on our drive. It was recommended to me by a number of US friends, however, so perhaps it’s more prominent as a destination if you live there?
Canyon de Chelly track
For those who’ve not heard of it, it’s a y-shaped canyon near Chinle, not far from the New Mexico state line and deep in the Navajo Nation area of Arizona. It starts off, at the point where you access it by vehicle, level with the surrounding land and rises to something in the order of 300m. at the far end of each of the two upper parts of the ‘Y’. It contains a river, through and along which you drive (are driven, in most cases) when taking a tour. Along its rim are numerous overlooks from which it’s possible to look down, and from one of which a descent to the canyon floor is both easily possible and permitted. Apart from that, access is only allowed with a Navajo guide.

The dominant features of the canyon are red sandstone, cottonwood trees, the meandering river, and numerous ancient, native American dwellings built into the cliff walls at various heights. These indicate how high the canyon floor was when they were built and date back nearly a millennium in some cases. It is, I can comfortably say, a marvellous place to visit.

Our Navajo guide was excellent, being very knowledgeable about the history of the place, as well as tolerant of frequent stops for photography and just wandering about. He waited ages, for example, whilst I attempted to find an angle which would allow me to exclude the green fence which marred the lower-right corner of the image below. I failed at the time but removed it later after some kind advice on Flickr. His tolerance may have been helped by it being off-season, though I think he was just very helpful. We also weren’t hanging about too much since a major storm system had skirted the area the day before and was still putting down snow throughout our time in the canyon (as can be seen in the images in this article, especially when viewed in the larger sizes).
Golden Fleece

But is it good for photography?

I think so! As with all canyons, capturing the scale is tricky, and the nature of access, by 4×4, through a river, and with a guide, means that repeated trips might be necessary to really work out what to do with the subject matter (this would become expensive!). Nonetheless, there are some very interesting colours in the trees and the canyon walls, and some spectacular views from the canyon rim.

We had just a half day in the place, which was sufficient, given the rather low ambient temperature and constant snowfall, but I saw a great many interesting rock formations, groups of trees which simply must have compositions within them, and areas of the river where reflections and winding sub-streams would make interesting abstracts.

Considering the wider area beyond the canyon itself, this is very much deep in Navajo country, and there were very few people indeed who were not native Americans – neither in the motel we stayed at, nor in the surrounding area. It was a fascinating cultural experience as a result. I was particularly amused by being informed at a fuel station, by a boy who looked about 3-4 years old, that “You’re not Navajo”, in a tone which suggested that this observation was worth making, at least to him!

I have no idea how busy the canyon becomes in peak times of the year, but visiting it in December, when we were the only vehicle there, was an excellent experience.

To return to the wider trip. I’m not going to write anything more as I have nothing photographic or observational to say about the other locations, other than that they’re as good as they’re reputed to be! I shall, however, finish with the following images from a sunrise and a sunset at Bryce Canyon, purely since the sheer vibrancy of the colour on the hoodoos was astonishing, even though I’d seen countless images of them before. These shots have both been desaturated considerably.
Bryce Canyon hoodoosBryce Canyon hoodoos

Tripod substitutes

Both images are also examples of captures made with the assistance of the Mandypod, an excellent tripod substitute which I promised to mention in one of these articles.

Whilst only a bipod (biped, technically), and only five feet high, this device is very flexible and makes a fairly good camera support when a tripod is not available. It did tend to vibrate, or shiver, slightly when the temperatures (as for the sunrise image) dropped to minus 19C, but it was, nonetheless, considerably better than hand-holding the camera, since I was shivering rather a lot at the time too… Not only that, but it’s self-powered, does not require carrying, and occasionally responds to voice commands. Height adjustment is naturally limited to six positions: the camera is located on top of the head or shoulder and this is combined with instructing the ‘pod to sit cross-legged, kneel, or stand upright. These six levels were invariably adequate, however. Extra stability can be achieved by locking the camera-holding arm around the neck of the ‘pod and bearing down firmly, although this could lead to stability issues if maintained during an exposure of more than a few seconds (due to a process known as asphyxiation). I was very grateful indeed to have the use of this device on a number of occasions when strong winds would otherwise have made shots impossible :-)


Thumbnail links to gallery for this article

Locations for photography: Zion National Park, Utah

Cottonwood congregation

I spent four nights in Zion and made not a single ‘big landscape’ image

Perhaps that sounds odd, in that Zion is a vast canyon with soaring, near-vertical rock walls and a generous helping of overall magnificence. It was our last stop on the long trip around the desert south-west of the US though, and by that time I was reacting against big pictures and literally focusing on detail everywhere. Fortunately, Zion has an abundance of excellent detail!

As with the other locations we visited, Zion has already been heavily documented and photographed, so this is a short piece about my overall impressions of, and reaction to, the place.

Zion cleftIn summary, and to be slightly contentious: it’s a US version of the English Lake District. I realise that anyone who’s been to both places will recognise that, in isolation, that’s a radically misleading statement. What I mean is that it feels like the Lake District; it’s atmosphere is strangely similar. It’s not the landscape itself that has this feel; it’s the way the landscape is used by people.

  1. It’s on a small scale – in fact, the principal canyon is not a great deal larger than Langdale, in terms of area, though it’s a winding, 10Km long, 500-700m. deep canyon cut into the surrounding desert.
  2. It feels very tame, compared to other national parks in the US south-west. Feels is the important word there: the Lakes don’t have cougars, rattlesnakes or bears, but then again, for most practical purposes, nor does Zion. The main areas are so populous with humans that the potentially aggressive wildlife stays well away. Conversely, the deer living on the canyon floor are so used to humans that they’re verging on tame and can be approached to within a couple of metres!
  3. Zion zig zagsIt’s manicured – not quite literally, though it is very neat. The owners of Zion Lodge (the only place to stay actually in the park) are currently converting most of the lawns around the buildings back to natural vegetation, yet the nature of the terrain means that the paths (sorry, trails in US-speak) are often the only option. Straying from them is sometimes forbidden, often impractical, and most are paved for the mile or so from the parking area which the average visitor will manage.
  4. StreamEven in the off-season, and mid-December is about as ‘off’ as it gets, we saw more people in Zion than anywhere else on our circuit. That’s not to say that it was anything approaching crowded, it was perfectly comfortable, but it certainly was relatively busy. I dread to think what summer is like, when the road up the canyon is closed to private vehicles and access is via what is apparently an excellent, multi-stop shuttle-bus service.

All those characteristics just kept making me think of Lakeland…. but a restricted Lakeland, one with:

  • less variety in its colours (a completely different palette in fact, but a more restricted one, at least in December);
  • Still deathless potential for choosing your own route from A to B;
  • and less space, both in real terms and in the naturally imposing nature of very high rock faces and a flat, narrow canyon floor littered with very neat, very well-maintained stopping places and viewpoints.

But hey, I like the Lake District – subject to the normal caveats of going there when it’s less crowded than it can often be – and I liked Zion. In particular, it was a great place to relax for a few days at the end of a long trip and many miles of driving.

Photographically, I found it excellent for the type of image I was, by then, making

It’s true that the rock which makes up most vertical and horizontal surfaces does tend to be the same red/yellow sandstone throughout the park, but it consists of numerous layers, and those layers vary in their thickness, degree of erosion, and pattern. If you want to look for abstraction in rock, this is a fabulous place to visit. One rather pleasing feature is that semi-abstract compositions can be made wherein the scale is very hard to determine: some of the rock images above are tens of metres across, though they could appear to be an order of magnitude or two smaller, at a glance (they often do to me, and I took them!). For example, if you examine the top right of the zig-zag rock image above, at the large size, there’s a bush there. That bush is about the size of a medium-sized dog, whereas I keep thinking the whole image is a small area!

Frozen in amberIn early winter, there are also frequent pockets of ice to be found, held in the curves of small watercourses, often with decaying vegetation, both encased in the ice and lying on the surface. I used these to add some different colours to what was otherwise becoming something of a ‘red and granular’ series of images.

Zion ice creamWould I go there again? Yes, though I wouldn’t wish to go out of my way too much to do so, and if I did it certainly wouldn’t be in summer. Further, I’d be looking to concentrate on similar subjects to those I found this first time. A search on images of Zion will bring up many shots of the sheer grandiosity of the canyon itself, but examine those carefully and there are relatively few significantly different compositions – the nature of the place is that it has a number of viewpoints,and the sheer scale of the rock walls means that varying a composition from the norm is decidedly tricky. Moving away from those viewpoints very much, certainly in a direction which would enhance the composition, tends to require the power of flight!

I do strongly recommend a visit there if you have the opportunity, I’m certainly very pleased indeed to have gone; but set your expectations appropriately in terms of the type of photography it’s possible to practise, and enjoy it also for simply being a rather wonderful place with great drama, easy access and, if you’re vaguely fit and can follow steep, but well-trodden trails up to 700m. from the valley floor and back down again, some superb viewpoints.
Winter colour

All of the above is, of course, very generalised

It’s entirely possible to go to Zion and make some superb ‘big landscape’ images, as proven by the number of great photographs that exist showing it looking truly majestic. My approach was somewhat dictated by the equipment I had with me, but, as I said above, it had more to do with simply having had a near-surfeit of ‘big landscapes’ by the time I arrived there. That said, in this particular case, I do think that the wealth of small scale, detail / abstraction / texture / colour images are the most interesting subjects Zion has to offer…
Zion waves


Thumbnail links to gallery for this article

Locations for photography: Death Valley National Park, California

I’ve long wanted to go to Death Valley; now I want to go back sometime – very much so!

I thought I’d post a short piece to give my impressions of Death Valley and to say that it’s by far my favourite location of the many I visited in the area. It’s simply superb, if you like that sort of thing. i.e. deserts – which I do. There are plenty, or at least several, detailed articles on-line describing where to go and when, so this simply relates some personal experiences and tries to give an idea of scale and breadth of opportunity there.
Salt flats at dawn
It’s not only the photographic opportunities – though those are both multitudinous and, within the context of the emphatic ‘desert landscapes’ theme, very varied – it’s simply a highly accessible and stunningly beautiful piece of land. There’s a relevant proviso to the ‘highly accessible’ aspect, which I’ll cover shortly, but, generally speaking, everything in Death Valley is approachable by normal car and a short walk, or no walk at all in some cases. I had only two days there, yet managed to easily visit all but one of the primary locations on most lists of ‘things to see and photograph in Death Valley’. Yes, that did involve starting slightly before dawn twice, and finishing after dark, but at least, in late November, dawn was after 0700; almost civilised!

If you’ve read my piece on the Bolivian Altiplano, you’ll know that I’m rather keen on deserts in general, and varied, rocky deserts in particular, especially those with salt flats. Death Valley has all of those features, including actual sand dunes, albeit restricted to a rather bizarre, footprint-covered patch only a couple of miles across, the Mesquite Dunes, in the centre of the valley, plus some which are relatively hard to get to. The rest of the national park area is flat(-ish!) terrain with gravel, scrub and small rocks at one end and various forms of dried salt formation at the other – and it’s all surrounded by dramatic, multi-coloured mountains which rise to a high point 3,454m above the lowest place in the valley, Badwater Basin, itself 86m below sea level.

To add to those numbers, the valley also holds the record for the highest temperature ever recorded in the Western Hemisphere: 56.7C. That was in July; late November is much cooler, though still in the mid twenties during the day, and much hotter than that in the direct sunshine. My idea of thoroughly clement, in fact :-)

Ubehebe Crater, Death Valley
Lots of extremes and impressive numbers then; the main attraction to me, however, is the sheer grandeur of the place. No, it doesn’t feel especially like a wilderness – that’s tricky to pull off when there are well-maintained roads running the length of the park – but it does feel wild and it is a genuinely threatening landscape in the hot months.

From both the photographer and tourist perspectives, the main sites are no more than a couple of hours apart by road. That makes it a big national park, by desert SW standards (many, you could realistically walk around, but not this one), but perfectly compact for touring about and moving from one end to the other in a day to capture different places at what might be the best times.

For me, the main objectives were the Badwater Basin salt flats – essentially because they’re so thoroughly surreal – and Racetrack Playa, where the famous moving stones are located, the ones which have never been seen to move, yet leave long tracks on the hexagonal ‘saucers’ of mud in this very flat basin. Unfortunately, the easiest access to the playa is a 28 mile long, rough gravel road. This can be driven in a high clearance, two wheel drive vehicle, but given several pieces of advice that, even in an off-road 4×4, it’s a good idea to carry two spare wheels, I’m not entirely convinced of the good sense of that idea (well, I am: it’s a bad idea!). The good thing about that unfortunate omission from my trip is the compelling argument for going back ;-)
Vegetation, Death Valley
Even having missed out on the racetrack and the nearby dunes, the collection of places we did get to, including the famous Zabriskie Point, Ubehebe Crater (volcanic, not meteorite-induced), the Devil’s Golf Course, and several narrow side canyons with fascinating formations and excellent colours, was genuinely spectacular and, as I’ve said, enormously varied. Were I to find myself there for a couple of weeks, ideally with a 4×4, the opportunities for photography would be far from exhausted.

Naturally, doing anything which could be considered original in the valley is a challenge, and not one I even attempted in two days, but the iconic locations are iconic for good reason, so just being there and having the opportunity to admire and photograph them is enough!
Manly Peak from Zabriskie Point


Thumbnail links to gallery for this article

Musings on: bonsai landscapes in the US south-west

For my first article about the western desert of the US, a few thoughts about how preconceptions of landscapes, as well as the circumstances in which we visit them, can affect our approach to photography – well, my approach at least, but I’m daring to assume that I’m not unique in this!

No, ‘Bonsai landscape’ is not the most usual description of the south western desert area of the US! My alternative title to this piece was:

‘Musings on: how over-familiarity, equipment availability, and travelling style affect the way we view landscapes’

…. but that was a teeny bit verbose; not to mention that I like the term ‘bonsai landscape’ to describe the very small areas, often with tiny bushes in them, which I seem to have photographed predominantly whilst there.

I’ll step back here and provide a bit of context.

I’ve just returned from a road-trip touring around various ‘big ticket’ sites in California, Nevada, Arizona and Utah, centred around Las Vegas as a convenient and pleasingly bizarre place to enter and exit the US. The thing is, it wasn’t a photographic tour, it was a non-solo, driving holiday, and the point was to ‘see the sights’, which meant Death Valley, the Grand Canyon, Monument Valley, Bryce Canyon, Zion Canyon, Antelope Canyon, the Canyon de Chelly and all sorts of less well-known things en route. I’ve written before about the incompatibility of ‘serious’ landscape photography and non-photographer companions, so I reluctantly chose to take just a camera body, two small, light lenses and one [polarising] filter. My graduated filters, the two lenses I use for most of my images, and my tripod all stayed at home.

The effect of this was interesting.

  • Firstly, and not surprisingly, it avoided all the problems I’d imagined, had I taken all the normal kit and gone with ‘intent to photograph’: no issues with anyone else having to wait around whilst I set up shots and waited for changes in light, and the big benefit of not having much to carry around either!
  • Secondly – and this is the more interesting result, and the subject of this musing – I ended up making very different images, in general, from those I’d expected to concentrate on.

Tiny elements of a vast landscape

The south-western desert area of the United States is a huge landscape, characterised by vast skies, monoliths, and deep canyons – the sort of thing which lends itself to big vistas. That impression is reinforced by a quick on-line search, where the photographic results which come back are predominantly ‘big stuff’ with ‘impressive skies’. I have very few of those shots. Yes, I do have some, but I have considerably more detail shots. And it’s not even medium level detail, the type of thing I generally find myself capturing; they’re real detail of landscape elements measured in single digit metres across the frame – not something I’ve done much of before. Whether I shall again is another question…. I like the results, but I think I prefer my normal work, such as ‘Plateau’, below.

'Plateau'

At the time, I didn’t notice what I was doing….

I recognised this concentration on detail for the first time whilst doing initial processing on the captures I made during the trip. Prior to that, I’d not been at all aware that I was behaving differently, in terms of what I photographed, from normal.

I think there are three reason for this – temporary! – change in subject matter:

Equipment availability
I had no wide angle lens: my widest was 35mm on Nikon DX format, or about 50mm full frame equivalent; not exactly wide. I had no tilt-shift lens, no tripod, and no graduated filters: all these things are essential to how I normally take photographs, so, inevitably, I couldn’t do what I would typically do. Instead, I gave up on real front-to-back sharpness, any idea of including sky, and any exposure longer than about a 30th of a second. OK, so the sky aspect was no great change – I often exclude it, as discussed before – but the other two things were!
Time availability
Generally, I’ll hang around at a site for at least an hour, and more often two or three, making a single capture. Doing that sort of thing at every location on a long road trip would have been…. let’s say ‘not sociable’, nor productive in terms of the primary objective of ‘seeing lots of things’. As a consequence, most of my images took a matter of a minute or less to see, compose and shoot – a bit of a difference from my usual approach.
Over-familiarity with the landscape
I think this is the most significant factor. The two above are both strong, practical arguments for a different approach, and consequently for a different set of take-home images, but this is the one which, I can see now, really drove the change.

I don’t mean that I’d been to these places before; I hadn’t. Yet, with these iconic and stunning locations being both heavily photographed and included in innumerable feature films, I found myself acutely and accurately aware of what I was going to see before I arrived in most places. It’s great, for example, to have seen Monument Valley in the real stone (and the real snow, and the real ice, and the real, very bitter, wind), but I didn’t exactly learn anything new, visually, from being there. It looks as it does in the films, and many people have made excellent images of the mesas through a combination of familiarity and repeated visits. I wouldn’t seek, or be able, to emulate those. Essentially, in one day, I didn’t feel that I could add anything on the vista scale.

'Antelope waves'

These three things conspired to make me concentrate, unknowingly at the time, on small elements of the overall photographic possibilities in each place

Lack of time and kit meant that compositions were necessarily simple and quickly made, and my reluctance to try and capture the vast vistas in a manner which was new, or improved upon, existing work, led to abstract and detailed shots. These will, I’m sure, remind me of the trip very well indeed, despite the fact that relatively few of them could be placed on a map with any certainty. Given that ‘making memories’ was the main point of my photography on this trip, that’s fine!

And?!

In retrospect, perhaps all of the above was obvious: perhaps I could have predicted the type of capture I’d make? Maybe so, but I didn’t, and discovering this after the fact is quite enlightening – it’s another new thing to add to my gradually increasing understanding of the photographic process as a whole.

It does, of course, mean that, in future, I shall be more aware of the possibilities of different styles – or at least of different choices of subject matter – emerging when I travel in different circumstances, with different equipment, and with overall different objectives from ‘serious photography’. Personally, I think that’s great: change and new revelation in any pursuit is, I strongly believe, a good thing, and it maintains interest :-)

'Bonsai bush - Zion'

I’m sure much of the above is painfully obvious to many people reading this….. If so, thanks for reading this far! This journal is, as I’ve said before, aimed at recording my progress as a newcomer to landscape photography, and this really was quite a major revelation to me, whether it should have been or not!

The making of: ‘Shadowed peaks’

I feel almost as if this is an image which ‘got away’. It’s very close indeed to my pre-visualisation of it, but not quite there.

The shot was taken early in the morning, high up on the Bolivian Altiplano. What I’d envisaged was that the two clouds – virtually the only ones in the sky that morning – would drift at a rate which would cast their shadows on the very top of each volcano at the same time. It didn’t happen: in this finished image, the far cloud has already passed the peak, heading rightward. It did come close though, and I still very much like the composition as the shadow on the foreground cone is perfectly positioned; I feel I can live with the minor one being just a little less than ideal.

I mentioned pre-visualising above, which suggests some considerable degree of planning. In practice, I made this image only about ten to fifteen minutes after first seeing the volcanoes, let alone the clouds and their shadows tracking towards the peaks. I had been fortunate enough to come over a rise in the ground in the Land Cruiser I was sharing with three other tourists just as the clouds formed and began to move towards their positions in the image.

'Shadowed peaks'

This was a five day trip from San Pedro de Atacama, in Chile, to the Salar de Uyuni, in Bolivia. The way these tours work is that the drivers more or less follow a beaten path to certain places that they think people will want to stop at, which basically means ‘all of the lagoons, and a couple of impressively large rocks‘. It’s far from being the ideal situation for photographers, but I was fortunate that there was another, similarly-afflicted tourist in the vehicle who also saw this scene developing. We both asked the driver, very nicely, to stop. Then we asked him to drive back a kilometre or so to get the darkened area of desert into the shot as a leading line, mainly since, with our rather inadequate Spanish, the whole ‘stopping the car’ process had taken rather longer than might be considered ideal. And then we waited. Fortunately, it was a relatively short wait: the other two passengers would quite possibly have become impatient had we insisted on just sitting in the desert watching a couple of clouds move for more than a very few minutes! As it turned out these two non-photographers proved to be very tolerant over the next few days though, and our driver quickly became used to being the last of the group of vehicles to arrive at every place – without exception. We tipped him well at the end!

The light levels were remarkably balanced between sky and foreground in this composition, so I had no need to use any graduated filters. I also didn’t have a polariser on the lens at the time, though the colour of the sky might suggest that there is. The altitude here is around 4,300m. so even a sky which has not been deliberately polarised by using a filter tends to be visibly polarised to the naked eye, hence the very deep blue colour. I took this shot in both portrait and landscape and I preferred this version; partly since it fits the subject matter slightly better, but also since the landscape version at this wide angle shows radical variation in the blue from left to right, which is so extreme that it rather spoils the image.

As to the very wide angle (this is the equivalent of 15mm on a full-frame SLR) I used it partly since we were too close to the volcanoes to use a longer focal length, and also because it emphasised the foreground dark line in the desert, which I thought was an important compositional element to lead the viewer’s eyes to the two mountains.

I think I can safely say that the only thing I’ve learnt from this photo so far is that sometimes, you get lucky….